subscribe here

electronic tamil

subscribe to our youtube channel " ELECTRONIC TAMIL ".keep suporting ..

18 Jul 2021

LoRa range test -Agni Sat

 LoRa range test -Agni Sat


RECEIVER  CIRCUIT :

LORA RECEIVER CODE : 


#include "LoRa.h"
#include "SPI.h"

//esp32 ss-5 rst-14 di0-2
//nodemcu ss-15 rst-16 di0-2

#define ss 15
#define rst 16
#define dio0 2

void setup()
{
Serial.begin(115200);
while (!Serial);
Serial.println("LoRa Receiver");

LoRa.setPins(ss, rst, dio0); //setup LoRa transceiver module

while (!LoRa.begin(433E6)) //433E6 - Asia, 866E6 - Europe, 915E6 - North America
{
Serial.println(".");
delay(500);
}
LoRa.setSyncWord(0xA5);
Serial.println("LoRa Initializing OK!");
}

void loop()
{
int packetSize = LoRa.parsePacket(); // try to parse packet
if (packetSize)

{

Serial.print("Received packet '");

while (LoRa.available()) // read packet
{
String LoRaData = LoRa.readString();
Serial.print(LoRaData);
}
Serial.print("' with RSSI "); // print RSSI of packet
Serial.println(LoRa.packetRssi());
}
}

TRANSMITTER CIRCUIT :

LORA TRANSMITTER CODE :


#include "LoRa.h"
#include "SPI.h"

//esp32 ss-5 rst-14 di0-2
//nodemcu ss-15 rst-16 di0-2
#define ss 5
#define rst 14
#define dio0 2

int counter = 0;

void setup()
{
Serial.begin(115200);
while (!Serial);
Serial.println("LoRa Sender");

LoRa.setPins(ss, rst, dio0); //setup LoRa transceiver module

while (!LoRa.begin(433E6)) //433E6 - Asia, 866E6 - Europe, 915E6 - North America
{
Serial.println(".");
delay(500);
}
LoRa.setSyncWord(0xA5);
Serial.println("LoRa Initializing OK!");
}

void loop()
{
Serial.print("Sending packet: ");
Serial.println(counter);

LoRa.beginPacket(); //Send LoRa packet to receiver
LoRa.print("hello from Agni sat");
LoRa.print(counter);
LoRa.endPacket();

counter++;

delay(1000);
}

14 Dec 2020

Agni satellite


 Agni satellite

it is a mini cube satellite it is in the size of 4x4x4 CM.


circuit diagram


Block diagram


code


//header file
#include "TroykaDHT.h"
#include "SPI.h"
#include "SD.h"
#include "SFE_BMP180.h"
#include "Wire.h"
//variable
DHT dht(5, DHT11);
const int chipSelect = 4;
File myFile;
SFE_BMP180 pressure;

#define ALTITUDE 138

void setup() {
// put your setup code here, to run once:
Serial.begin(9600);
dht.begin();

while (!Serial) {
; // wait for serial port to connect. Needed for native USB port only
}
Serial.print("Initializing SD card...");
if (!SD.begin(4)) {
Serial.println("initialization failed!");
while (1);
}
Serial.println("initialization done.");


// open the file. note that only one file can be open at a time,
// so you have to close this one before opening another.

if (pressure.begin())

Serial.println("BMP180 init success");
else

{

Serial.println("BMP180 init fail\n\n");

Serial.println("Check connection");

while (1);

}

}

void loop() {

// put your main code here, to run repeatedly:
dht.read();
char status;

double T, P, p0, a;
myFile = SD.open("data.txt", FILE_WRITE);


// if the file opened okay, write to it:

if (myFile) {

Serial.print("Writing to test.txt...");

Serial.print("Temperature = ");

myFile.println(dht.getTemperatureC());

Serial.println(" C \t");

Serial.print("Temperature = ");

myFile.println(dht.getTemperatureK());

Serial.println(" K \t");
Serial.print("Humidity = ");

myFile.println(dht.getHumidity());

Serial.println(" %");

myFile.print("absolute pressure: ");

myFile.print(P, 2);

myFile.print(" hpa = ");

myFile.print(P * 100, 2);

myFile.print(" pa = ");

myFile.print(P * 0.000986923, 2);

myFile.print(" atm = ");

myFile.print(P * 0.750063755, 2);

myFile.print(" mmHg = ");

myFile.print(P * 0.750061683, 2);

myFile.print(" torr = ");

myFile.print(P * 0.014503774, 2);

myFile.println(" psi");

p0 = pressure.sealevel(P, ALTITUDE); // we're at 943.7 meters

myFile.print("relative (sea-level) pressure: ");
myFile.print(p0, 2);

myFile.println(" hpa ");;

a = pressure.altitude(P, p0);

myFile.print("your altitude: ");

myFile.print(a, 0);

myFile.println(" meters ");

delay(2000);

// close the file:

myFile.close();

Serial.println("done.");

} else {

// if the file didn't open, print an error:
Serial.println("error opening test.txt");
}
}


22 Oct 2020

pulse oximeter(Max30100)

 pulse oximeter with arduino (Max30100) 


libraries file 

Max30100
the library file for max 30100 link was here click the download button to download the library file


oled
the library file for oled display link was here click the download button to download the library file


pin connection

  • GND  to GND of arduino 
  • VIN to 3.3v of arduino
  • SCL to A5 of arduino 
  • SDA to A4 of arduino

Circuit diagram


#include "Wire.h"
#include "MAX30100_PulseOximeter.h"

#define REPORTING_PERIOD_MS 1000
PulseOximeter pox;
uint32_t tsLastReport = 0;

void onBeatDetected()
{
Serial.println("Beat!");
}
void setup()
{
Serial.begin(115200);
Serial.print("Initializing pulse oximeter..");

if (!pox.begin()) {
Serial.println("FAILED");
for(;;);
}
else {
Serial.println("SUCCESS");
}
pox.setIRLedCurrent(MAX30100_LED_CURR_7_6MA);
pox.setOnBeatDetectedCallback(onBeatDetected);
}

void loop()
{
pox.update();
if (millis() - tsLastReport > REPORTING_PERIOD_MS) {
Serial.print("Heart rate:");
Serial.print(pox.getHeartRate());
Serial.print("bpm / SpO2:");
Serial.print(pox.getSpO2());
Serial.println("%");
tsLastReport = millis();
}
}


pin connection

Max30100
  • GND TO GND of arduino
  • VIN to 3.3V of arduino
  • SCL to A5 of arduino
  • SDA to A4 of arduino

OLED:
  • GND to GND of arduino
  • VCC to 5V of arduino
  • SDA to SDA of arduino
  • SCL to SCL of arduino

Circuit diagram with display


Coding


#include "Wire.h"
#include "MAX30100_PulseOximeter.h"
#include "Adafruit_GFX.h"
#include "OakOLED.h"
#define Sec 1000
OakOLED oled;

PulseOximeter pox;

uint32_t tsLastReport = 0;

const unsigned char bitmap [] PROGMEM= {
0x00, 0x00, 0x00, 0x00, 0x01, 0x80, 0x18, 0x00, 0x0f, 0xe0, 0x7f, 0x00, 0x3f, 0xf9, 0xff, 0xc0, 0x7f, 0xf9, 0xff, 0xc0, 0x7f, 0xff, 0xff, 0xe0, 0x7f, 0xff, 0xff, 0xe0, 0xff, 0xff, 0xff, 0xf0, 0xff, 0xf7, 0xff, 0xf0, 0xff, 0xe7, 0xff, 0xf0, 0xff, 0xe7, 0xff, 0xf0, 0x7f, 0xdb, 0xff, 0xe0, 0x7f, 0x9b, 0xff, 0xe0, 0x00, 0x3b, 0xc0, 0x00, 0x3f, 0xf9, 0x9f, 0xc0, 0x3f, 0xfd, 0xbf, 0xc0, 0x1f, 0xfd, 0xbf, 0x80, 0x0f, 0xfd, 0x7f, 0x00, 0x07, 0xfe, 0x7e, 0x00, 0x03, 0xfe, 0xfc, 0x00, 0x01, 0xff, 0xf8, 0x00, 0x00, 0xff, 0xf0, 0x00, 0x00, 0x7f, 0xe0, 0x00, 0x00, 0x3f, 0xc0, 0x00, 0x00, 0x0f, 0x00, 0x00, 0x00, 0x06, 0x00, 0x00, 0x00, 0x00, 0x00, 0x00, 0x00, 0x00, 0x00, 0x00 };
void onBeat()
{
Serial.println("Beat!");
oled.drawBitmap( 60, 20, bitmap, 28, 28, 1);
oled.display();
}

void setup()
{
Serial.begin(9600);
oled.begin();
oled.clearDisplay();
oled.setTextSize(1);
oled.setTextColor(1);
oled.setCursor(0, 0);

oled.println("Initializing pulse oximeter..");
oled.display();
Serial.print("Initializing pulse oximeter..");

if (!pox.begin()) {
Serial.println("FAILED");
oled.clearDisplay();
oled.setTextSize(1);
oled.setTextColor(1);
oled.setCursor(0, 0);
oled.println("FAILED");
oled.display();
for(;;);
}
else {
oled.clearDisplay();
oled.setTextSize(1);
oled.setTextColor(1);
oled.setCursor(0, 0);
oled.println("SUCCESS");
oled.display();
Serial.println("SUCCESS");
}
pox.setOnBeatDetectedCallback(onBeat);
}

void loop()
{
pox.update();

if (millis() - tsLastReport > Sec) {
Serial.print("Heart BPM:");
Serial.print(pox.getHeartRate());
Serial.print("-----");
Serial.print("Oxygen Percent:");
Serial.print(pox.getSpO2());
Serial.println("\n");
oled.clearDisplay();
oled.setTextSize(1);
oled.setTextColor(1);
oled.setCursor(0,16);
oled.println(pox.getHeartRate());

oled.setTextSize(1);
oled.setTextColor(1);
oled.setCursor(0, 0);
oled.println("Heart BPM");

oled.setTextSize(1);
oled.setTextColor(1);
oled.setCursor(0, 30);
oled.println("Spo2");

oled.setTextSize(1);
oled.setTextColor(1);
oled.setCursor(0,45);
oled.println(pox.getSpO2());
oled.display();
tsLastReport = millis();
}
}

8 Jul 2020

arduino port enable

How to enable com port for Arduino board -step by step


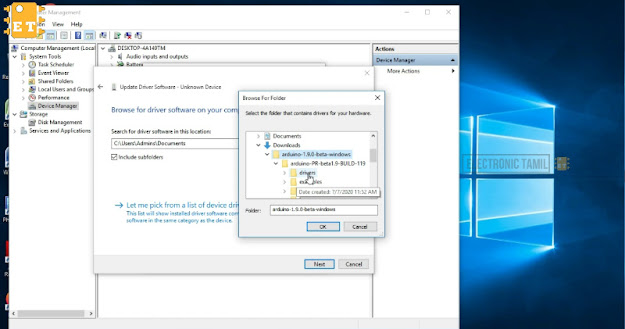
right click on the "THIS PC" or "MY COMPUTER", then click Mange
it open a new window,  In that select Device Manager and find the port of the board, 
(connect the Arduino board and disconnect it, you can find the board)  

Then double click the port 

Then select the driver and click Update driver


then click "Browse my computer for driver software" 


then browser the Arduino driver folder


after browse the folder then click next

it start installing wait for a few minutes

now click install and wait  
now the drive will be installed. now close it 

now it shows the port of the board .


Youtube tutorial

7 Jul 2020

installation of arduino ide

How to install Arduino IDE in window-10


1.Open the Arduino official website (Arduino site)


2.Then scroll down and Download the latest Arduino IDE or Arduino IDE (Beta)


3.Then extract the zip file 


4.Then create a shortcut file and send t to desktop 


youtube tutorial


Hey, we've just launched a new custom color Blogger template. You'll like it - https://www.electronictamil.ga/
Join Our Newsletter